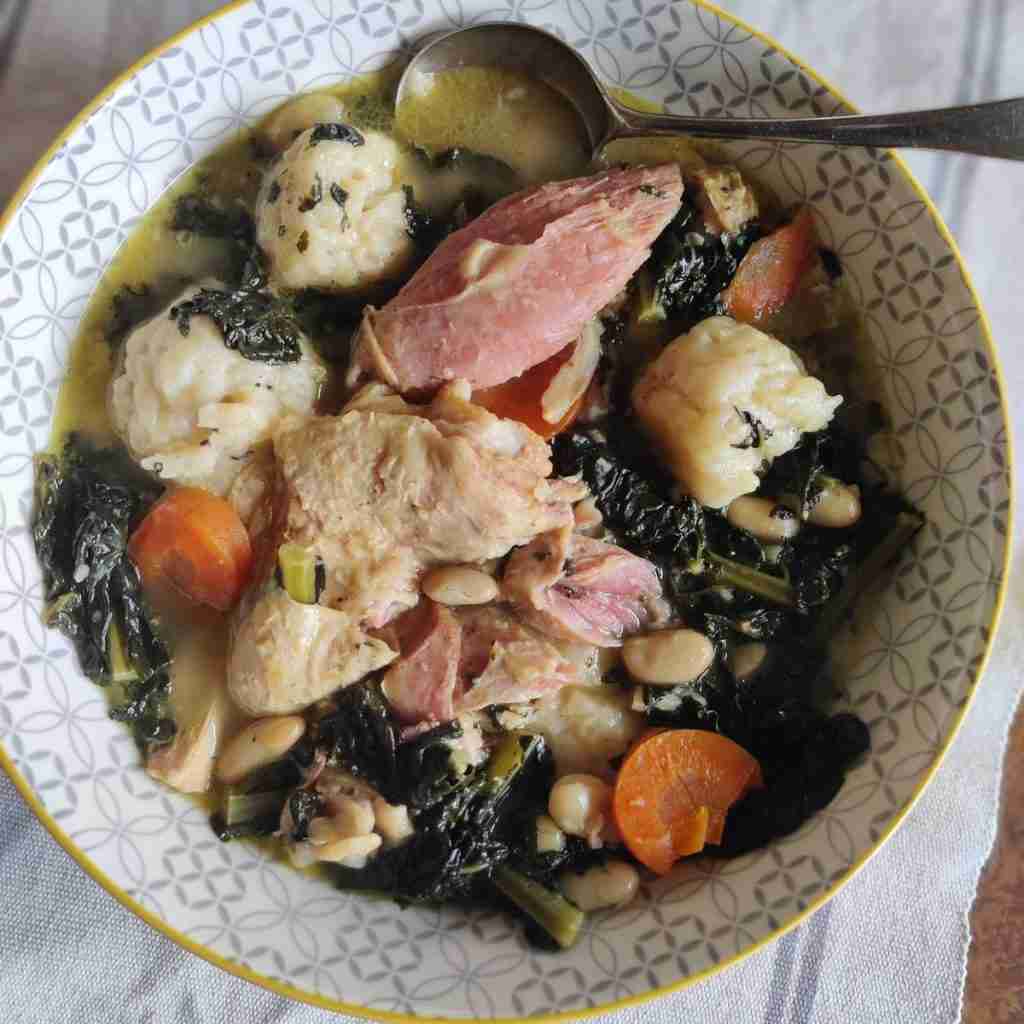
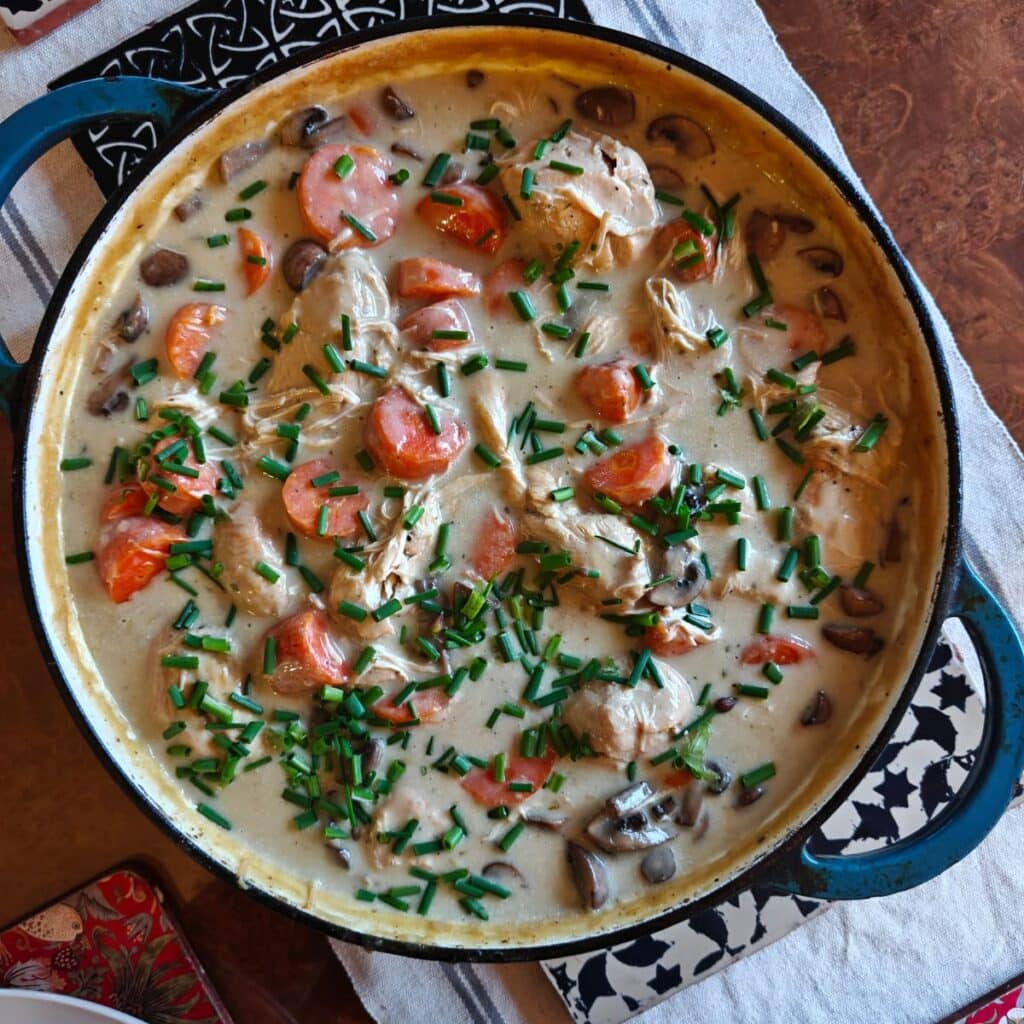
Tel: 01954 201724          Blog          Contact

Categories
recipe

Chicken blanquette

Chicken blanquette

This is more of a winter dish than something we eat in the middle of April! But, although spring has sprung here in the UK, there is still a bit of a chill in the air. So, something warm and comforting is a good compromise while we wait for the temperatures to catch up with the calendar. So here you have it my "chicken blanquette" or "blanquette de poulet" as we say in France, in its rich and creamy sauce!

image of a cast iron pan filled with pieces of chicken, carrots and mushrooms, topped with fresh chives in a white sauce, recipe can be found on cookery school Gourmandises Academie, Cambridge

Ingredients:

  • 800g Chicken thighs or breast, cut into large chunks

  • 1 Large onion, chopped

  • 3 cloves of garlic, roughly chopped
  • 2 Carrots, peeled and cut into big chunks

  • 1 Leek, cut into big chunks

  • 1 Bouquet garni (thyme and bay leaf)

  • 750ml of water

  • 250g mushrooms, quartered

  • 40g Butter

  • 40g Plain flour

  • 200ml Double cream

  • a glass of white wine

Method:

Start by browning the chicken pieces in a little bit of butter, season with salt and pepper (preferably white pepper as we don’t want to darken the sauce too much). Once lightly brown, set aside and add the onions and garlic, then the carrots, leek and bouquet garnie, deglaze with a glass of white wine. 
Place the chicken pieces and all those lovely veg in a large pot and cover with the water. Bring to a light boil, lower the heat, cover, and simmer gently for an hour.

While the chicken simmers, melt a small knob of butter in a pan and sauté the mushrooms.

Once the chicken is cooked, strain the liquid into a bowl—do not throw it away! Keep the chicken and vegetables warm in the pot.
In a separate pan (remember, it has to be large enough to take chicken and veg), melt the 40g of butter. Whisk in the flour and cook for 1 minute (don’t let it brown). Gradually whisk in about 500ml of the hot cooking liquid until you have a smooth, thick sauce. Add the double cream and stir.

Then, pop the chicken, cooked vegetables, and mushrooms back into the creamy sauce. Simmer for another 30 minutes and serve with a sprinkle of chives or fresh parsley. 

In France, we eat it with rice but mash potatoes is a good fit too.

Bon appétit!

Corinne

P.S: you can also find this recipe on YouTube

What else can I use instead of chicken?

A blanquette is traditionally made with veal in France. What makes a blanquette is its white sauce. Veal is used because of its tenderness and its light flavour as compared to beef or lamb. That’s why chicken is the best fit in this dish if you can’t get hold of veal. 

Categories
recipe

Just a good old stew!

Just a good old stew!

Autumn has fully arrived here in Cambridge. The clock went back over the weekend as well. So, with days getting shorter, something warm and delicious like a good old stew is a must in our house. I love stews, not only are they nutritious and comforting but they are so easy to make too. I posted a picture of the one I made over the weekend on Instagram and many of my followers have asked what went in it. So here it is "Just a good old stew"!

image of a bowl of stew with dumplings, ham, chicken and vegetables, you can find this recipe at cookery school gourmandises academie, Cambridge

Ingredients:

Cavolo nero Kale (can be replaced by cabbage)

One carrot

One celery stick

A tin of cannellini beans

Two chicken legs

A bit of left over ham hock

A bay leaf 

Half a tsp of turmeric

Salt and pepper to season

Method:

Stew is easy right, the hardest bit is chopping the veggies. After that, everything goes in the pot. I had two pieces of chicken legs in my freezer, and a bit of cooked smoked ham hock too. So I started by cooking those from frozen, I popped the legs and ham hock in a big pot and covered with water, nothing else at that stage. I let it boil for 30 minutes, and got rid of the white foam on top. I then added my chopped veggies, in this one I used one carrot, one celery stick and a bag of Cavolo nero kale, salt and pepper, a bay leaf, a tin of cannellini beans (drained) and my secret ingredient half a tsp of turmeric. That’s it! Let it stew on a low heat for a good two hours, the meat will fall off the bone by that point. 30 minutes before serving I added some dumplings, but you could also add old bits of bread too. The beauty of a stew is that there is no rule, whatever is in your fridge or freezer works! 

Bon appétit!

Corinne

What can I add to a stew?

The beauty of a stew is you can add whatever you want. It can be made with just veg, you can add meat of course. But the one thing people don’t often think of is spices, yes you can spice it up, I like to add a bit of turmeric to mine, sometimes I also add a bit of ginger. It’s really up to you.

Categories
recipe

Maroccan preserved lemons

Maroccan preserved lemons

I am a huge fan of North African cuisine especially Tagine. I spent my childhood in the South of France and had a lot of friends from that part of the world. Moroccan preserved lemons are a key element of a tagine. They are a wonderfully tangy, salty, and aromatic ingredient that adds a unique depth of flavor to many dishes, especially lamb. The recipe itself is dead easy, but requires patience as the lemons need time to cure. It's summer in a jar!

image of a jar filled with lemons, bay leaves and black peppercorns, you can find the recipe at cooking school gourmandises academie, Cambridge

Ingredients:

  • 6-8 unwaxed lemons (or as many as fit snugly in your jar)

  • 1/2 cup coarse sea salt preferably, but table salt is fine too

  • A few extra lemons for juicing (if needed)

  • Bay leaves and whole black peppercorns, you don’t have to add them but they do add a depth of flavour to the cured lemons.

  • You will also need a glass jar with a tight lid, I went for a Kilner type jar. You will need to sterilize it.


Method:

    • Wash the lemons.

    • Trim a thin slice off both ends of each lemon to create a flat surface.

    • Stand each lemon upright. Cut a deep cross into each one from the top, going about 3/4 of the way down towards the base, so the four quarters remain attached at the bottom.

  • Salt the lemons:

    • Open up each lemon gently along the cuts.

    • Generously stuff the inside of each lemon with coarse salt. Don’t be shy – this is key to the preservation process. You’ll likely use about 1 tablespoon of salt per lemon.

  • Pack the jar:

    • Sprinkle a tablespoon or two of salt at the bottom of your sterilized jar.

    • Begin packing the salted lemons tightly into the jar. Press them down firmly with a spoon. This is crucial for releasing their juices and ensuring they are submerged. The tighter you pack them, the more juice will be released.

    • If you’re using bay leaves and peppercorns, add them in layers as you pack the lemons.

  • Add lemon juice (if needed): As you pack, the lemons will release their own juice. The goal is for the lemons to be completely submerged in liquid. If, after packing all the lemons tightly, they are not fully covered, squeeze the juice from an additional 1-2 fresh lemons and add it to the jar until the lemons are totally submerged.

  • Seal and cure:

    • Seal the jar tightly with the lid.

    • Store the jar in a cool, dark place (like a pantry or cabinet) at room temperature for a good two days, then refrigerate.

  • Patience is key: The lemons need to cure for at least 3-4 weeks, but ideally 1 month or longer. The longer they cure, the more mellow and complex their flavour will become, and the rinds will soften to a jelly-like texture.

  • Storage:  They will keep for at least 6 months, and often up to a year or more, as long as they remain submerged in their brine.

What can preserved lemons be used for?

Preserved lemons are a key element of any tagine, especially lamb. But, they can also be used in stews, salads, dressings, and even with roasted chicken or fish. They are just a beautiful ingredient to add to your pantry. 

Categories
recipe

Two vibrant sides for your roast lamb

Two vibrant sides for your roast lamb

If you are serving lamb for Easter, here are two sides you may like to add to your roast. Lamb is a rich meat and it's always good to have something that both enhance its flavour and cuts through the richness too. That's why mince sauce is so good with it. Inspired by the vibrant flavours of the Middle East, these two easy-to-prepare sides are the perfect companions to your succulent lamb. First, a smoky and zesty aubergine dish, followed by a bright and crunchy cauliflower and broccoli salad.

picture of bowl filled with some kind of hummus, the recipe can be found on the blog of cookery school gourmandises academie, Cambridge
image of a salad bowl containing broccoli, cauliflower and tomatoes, you can learn how to make it at cooking school Gourmandises Academie, Camridge

Ingredients:

For the Smoky Aubergine with Lime & Chickpeas:

One aubergine

One tin of chick peas drained and rinsed

Two cloves of garlic crushed 

Juice and zest of one lime

One TSP of smoked paprika

For the Bright Cauliflower & Broccoli Salad with Cannellini Beans:

One broccoli and one cauliflower cut into florets

Six cherry tomatoes halved

One tin of cannellini beans, drained and rinsed

Olive oil

The juice and zest of one lime

Method:

Wrap the aubergine in tin foil and place in a 200°c oven until soft. Once cooked, peel off the skin.

In a food processor, add the chick peas, aubergine, garlic, lime juice and two table spoons of olive oil, salt and pepper to season. Mix to a paste, garnish with the paprika and an extra table spoon of olive oil. Serve as a dip with your lamb.

Blanch the cauliflower and broccoli in hot boiling water for 2 minutes and drain.

In a bowl, add the cannellini beans, hot cauliflower and broccoli, and the tomatoes, salt and pepper to season, the lime juice and olive oil and mix. It’s important to do this when your vegetables are still hot, so they can soak up all the juices. Serve hot or cold with your roast lamb.

Bon appétit!

Corinne

What else goes well with lamb?

Lamb is a rich meat so you need something to contrast and balance the flavours. Mint sauce of course is excellent, but anything zesty also works well. If you’re serving green beans for example, add a table spoon of lemon juice. When roasting your lamb, think about adding some preserved lemons especially for a leg of lamb.

Categories
recipe

Asian inspired chargrilled baby gems

Asian inspired chargrilled baby gems

I don't know about you but I often run out of ideas about what to have for lunch. I like it tasty, healthy and not too heavy so I don't end-up wanting a nap afterwards. This recipe fits it all. "Asian inspired baby gems". It's also super quick to rustle-up.
(P.S I do realise not everybody has the opportunity to work from home and prepare this, it's a good one for a lazy Saturday)

image of a plate filled with avocado, chargrilled lettuce and panfried fillet of fish

Ingredients:

One baby gem per person 

One spring onion

Grated ginger (the size of a tea spoon)

One tsp of soy sauce

One tsp of sweet chilli sauce

Zest and juice of one lime

You will need a griddle pan for this recipe

Method:

Prepare the Asian sauce. In a bowl, mix the soy, chilli sauce, lime and ginger. Add the chopped spring onion and mix. Set aside.

Put your griddle pan on a high heat. Halve or quarter the baby gems, brush both sides with olive oil, and grill until slightly charred and tender.

Once your baby gems are tender, drizzle them with the Asian sauce and serve with avocado and pan fried sea bass.

And that is it! As simple and as delicious as that!

Bon appétit!

Corinne

Tip: the dressing can also be used on any salad.

What vegetable can you char?

Any vegetable works, at this time of year I also chargrill leeks, it intensifies their flavour and sweetness. 

Categories
Uncategorized

Posh fish pie

Posh fish pie

With the cold weather snap here in the UK and the rather gloomy January, comforting food is my remedy at this time of year. And for me there is nothing more comforting and soul feeding than my "Posh fish pie", yes posh, because I decided to add king prawns, a good dollop of creme fraiche and a splash of white wine.

Image of a blue cast iron pan with a pie inside, melted, baked cheese on top, the recipe can be found at Gourmandises Academie, Cambridge

Ingredients:

  • 1 bag of frozen fish pie mix 
  • 1 bag of frozen king prawns
  • 1 onion, chopped
  • 1 carrot, chopped
  • 1 celery stalk, chopped
  • 2 tablespoons butter
  • 2 tablespoons of flour
  • 2 tablespoons of crême fraîche
  • 1 teaspoon Dijon mustard
  • 1 glass of white wine
  • Grated cheddar (any hard cheese would work here)
  • 4 to six potatoes, cooked and mashed
  • Optional but highly recommended 200 g of cooked broccoli and cauliflower florets
  • Salt and pepper to season

Pre-heat your oven at 180º C

Method:

For this recipe, I tend to use my shallow cast iron pan, as it can go in the oven, so no need to transfer into a separate pie dish. I just love a one pot dish!

  • Start by melting the butter over a medium heat. Add the onion, carrots, and celery and cook until softened, about 5 minutes.
  • Stir in the flour and cook for a minute or so. Gradually whisk in the wine and then add your crême fraîche, the sauce will become nice and thick.
  • Bring to a simmer and add your fish and prawns from frozen, as they defrost, the sauce will become a little bit thinner but that is fine, it will thicken again once in the oven.
  • Add your broccoli and cauliflower at this point, as well as a teaspoon of Dijon mustard, salt, and pepper.
  • Turn the heat off and let everything cool down. It’s easier to add the mashed potatoes to a cool mix.
  • Once cooled, top with your potatoes and sprinkle with cheddar cheese.
  • Bake for 30-35 minutes until golden brown on top.

Bon appétit!

Corinne

Can I use any fish for fish pie?

You can use any type of fish, but cod, haddock, and salmon are best for this dish. You do need to have one of the fish to be smoked as it is a key flavour for fish pie. I added prawns, you could also add lobster or crab meat.

Categories
Christmas cooking recipe

Raspberry, choc mousse and ginger nut verrine

Raspberry, choc mousse and ginger nut verrine

I think sometimes we tend to overthink desserts at Christmas, meaning it all needs to be grand which often equals to a lot of hours in the kitchen. Who wants that kind of stress? You may think I do but actually I'm all for simple yet delicious entertaining at Christmas, what's the point of a party if you're glued to your kitchen! Well here's a showstopper of a dessert that won't take long to rustle up, my "Raspberry, choc mousse and ginger nut verrine"

Picture of a trifle with a chocolate mousse and fresh raspberries on top, you can find the recipe on the blog of cookery school Gourmandises Academie, Cambridge

Ingredients:

  • 250 g of fresh raspberries
  • 2 tablespoons of icing sugar
  • 20 g of dark chocolate
  • 100 ml of double cream
  • 6 ginger nut biscuits
  • This quantity will make roughly two to three verrines
  • You will need cocktail glasses or wine glasses work too

Method:

In a bowl crush six raspberries. Place six ginger nut biscuits in a freezer bag and bash them to a crumble with a rolling pin. Add two tablespoons of that crumble to the raspberry mix. Melt your chocolate in the microwave or over a bain marie. Add the icing sugar to the double cream and mix, then fold in the melted chocolate and whisk to a soft mousse consistency. Time to assemble your verrines. Start by adding two tablespoons of ginger nut crumble to the bottom of your glasses, then add your raspberry mix, and then the mousse. Decorate with fresh raspberries. 

Bon appétit!

Corinne

Check out my other recipes here 

Can you make a savoury verrine?

Yes you can. They are very popular as a starter in France especially during the festive season. Layers of cheesy biscuits with a salmon mousse topped with lime zest is a really tasty savoury version for example.

Bon appétit!

Categories
Christmas cooking

Duck and pheasant terrine

Duck and pheasant terrine

It's the first of November tomorrow and before we know it Christmas will come around so fast. This is a dish that I tend to serve during the festive season. It was definitely a success at my Bistrot last weekend. So I thought why not share this beautiful recipe with you. You'll need to arm yourself with a bit of patience but it's well worth the effort.

Picture of a terrine dish dish with an orange lid by the side of it. The terinne has been decorated with bay leaves on top. You can find the recipe at Gourmandises Academy, Cambridge

Ingredients:

Two deboned duck legs 

Two pheasant breasts

3 chicken livers

5 slices of belly pork (without the bone and the skin)

Freshly ground pepper and salt 

4 bay leaves

Three table spoon of plum rum ( you can use whisky or port too)

Plenty of fresh thyme

One egg

Pre-heat your oven at 170º C

You will need a terrine dish for this (mine is roughly 20 cm X 17 cm and 9 cm deep)

Method:

You will need to mince your belly pork and livers first, if you don’t have a mincer you can use a knife instead (a really sharp one) that will allow you to mince manually.  The duck and the pheasant will need to be chopped with their skin (the fat coming from the skin is really important here) into small pieces, we don’t want them to be totally minced like the pork. 

Then mix everything together in a large bowl, rum, egg, thyme included. Season with salt and pepper. For that amount start with half a tsp of salt.

To see whether you have enough salt, cook a little bit of the mixture and taste it, if you need to add more salt do so. 

Pop your mixed ingredients in your terrine, place the bay leaves on top, lid on and let your terrine cook in a 170°C oven for a good 1H30. Once cooked, leave the terrine to cool and pop it in the fridge. It’s best to eat your terrine the day after you made it, to allow the flavours to develop. 


Bon appétit!

Corinne

How do you eat duck terrine?

Slice your terrine into small chunks. In France we tend to serve it with cornichons (gherkins) and bread. But it also works well with a good chutney or a piccalilli. It’s the perfect dish to serve during the festive season, especially at a party with a buffet.

Categories
recipe

Green tomato galette with green tapenade and goat cheese

Green tomato galette with green tapenade and goat cheese

The weather has turned really cold here in the UK with temperatures close to freezing at night. And tomatoes don't like it, they develop brown patches if we don't pick them. This recipe is just perfect if like me your tomatoes haven't had time to reach their gorgeous red. So here you have it my "green tomato galette with green tapenade and goat cheese".

image of a tart with sliced green tomatoes and goat cheese on top, you can find the recipe on the blog of Gourmandises Academie, Cambridge

Ingredients:

One to two tomatoes sliced 

I make my own shortcrust but one roll of shop bought shortcrust pastry is fine too.

One jar of green olives 

3 cloves of garlic

Olive oil

Plenty of fresh thyme

Goat cheese (if you don’t like goat cheese, you can replace with camembert or cheddar)

Pre-heat your oven at 180º C

Method:

Start by making the tapenade. In a food processor, blend the olives, garlic and thyme to a coarse paste. 

Roll out your pastry and prick the bottom with a fork. Spread two to three TBSP of tapenade on the base, don’t cover all of the pastry, leave a 2 cm gap for a border. Then, place the tomatoes on top and then the goat cheese, as much cheese as you like.  Then fold the 2 cm gap of pastry that you left to form a border (as per picture above). Pop in the oven for a good 30 minutes until the pastry is golden on top. Serve hot or cold with a salad. 

Bon appétit!

Corinne

What can I do with a lot of green tomatoes?

Apart from the obvious pickle and chutney, did you know that you can get them to ripe? Pop them in a draw with a few tomatoes that are already red and a banana or two. And they will ripe eventually, just be patient. Trust me it works. You just have to remember to change the bananas.

If not, you can also use them in a curry like you would with a ripe tomato or a even in a chilli. I also make a delicious tomato salsa with them. So don’t panic if you have green tomatoes!

Categories
recipe

Stuffed cabbage rolls in a rich vermouth and tomato sauce

Stuffed cabbage rolls in a rich vermouth and tomato sauce

This is the first year that I have managed to harvest my cabbages without the slugs and snails going for them first. They are so huge and beautiful, and of course super tasty. Cabbage is a great vegetable to cook with but here's a recipe you're all gonna love "stuffed cabbage rolls in a rich vermouth and tomato sauce".

Image with a pan filled with cabbage rolls in a tomato sauce, the recipe can be found at cookery school Gourmandises Academie

Ingredients:

8 large cabbage leaves 

500 g of mince beef

200 g of plain sausage meat 

80 ml of vermouth

One tin of chopped tomatoes

A bit of cheddar

One onion chopped

4 cloves of garlic


Method:

  1. Prepare the cabbage:  I removed 8 large leaves out of the green cabbage I grew in my garden. Because they’re organically grown they were huge, so I could halve them, but you might need a bit more depending on how big your cabbage is. Place the leaves in a large pot of boiling water. Cook for a few minutes until the leaves are tender enough to roll. Drain and set aside.
  2. Make the filling: In a large bowl, combine the mince beef and sausage meat. Season with salt and pepper, I also added some fresh thyme and oregano from the garden.
  3. Assemble the rolls: Place a spoonful or two of the filling onto each cabbage leaf and roll up tightly.
  4. Make the sauce: In a large saucepan, heat two tablespoons of olive oil. Add the chopped onion and garlic, and cook until softened. Pour in the vermouth and let it simmer for a few minutes until reduced. Add the tin of chopped tomatoes and bring to a simmer for a good 20 minutes.
  5. Cook the rolls: Place the stuffed cabbage rolls in the sauce, cover, and bake in an 180º C oven for 30-40 minutes, or until the sauce has thickened. Top with grated cheddar cheese and serve.

Bon Appétit!

Corinne

You can check out my other recipes here 

Picture of a lady holding a huge cabbage

Why is my stuffed cabbage tough?

It is really important to pre-cook your cabbage leaves before filling them. This process will soften the leaves and make them easier to roll. It also allows you to halve the cooking time.

Bon appétit!